

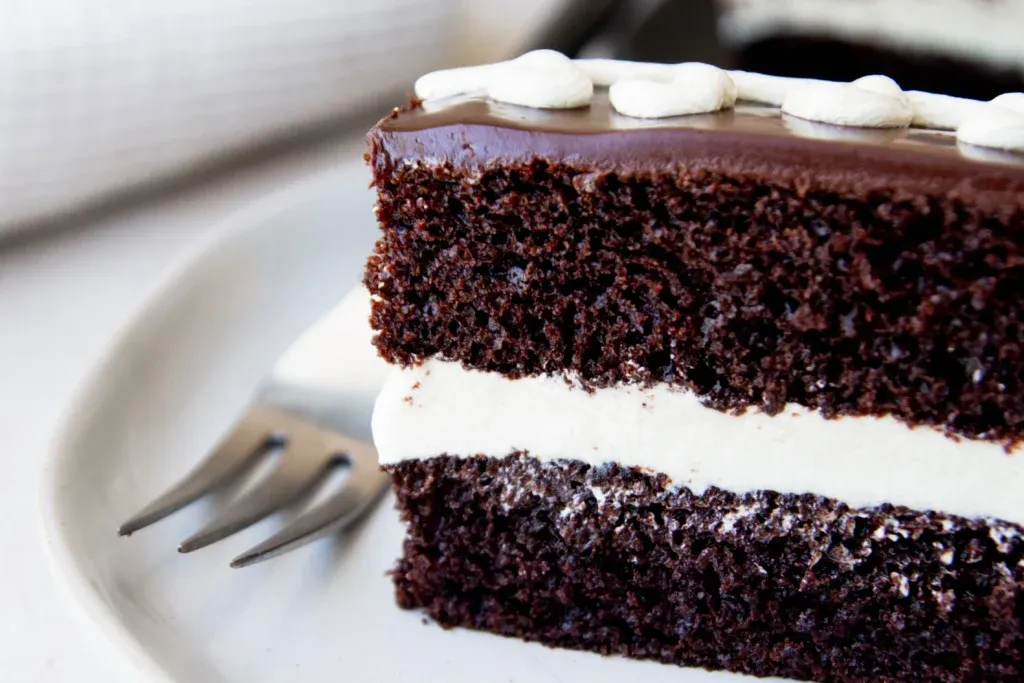
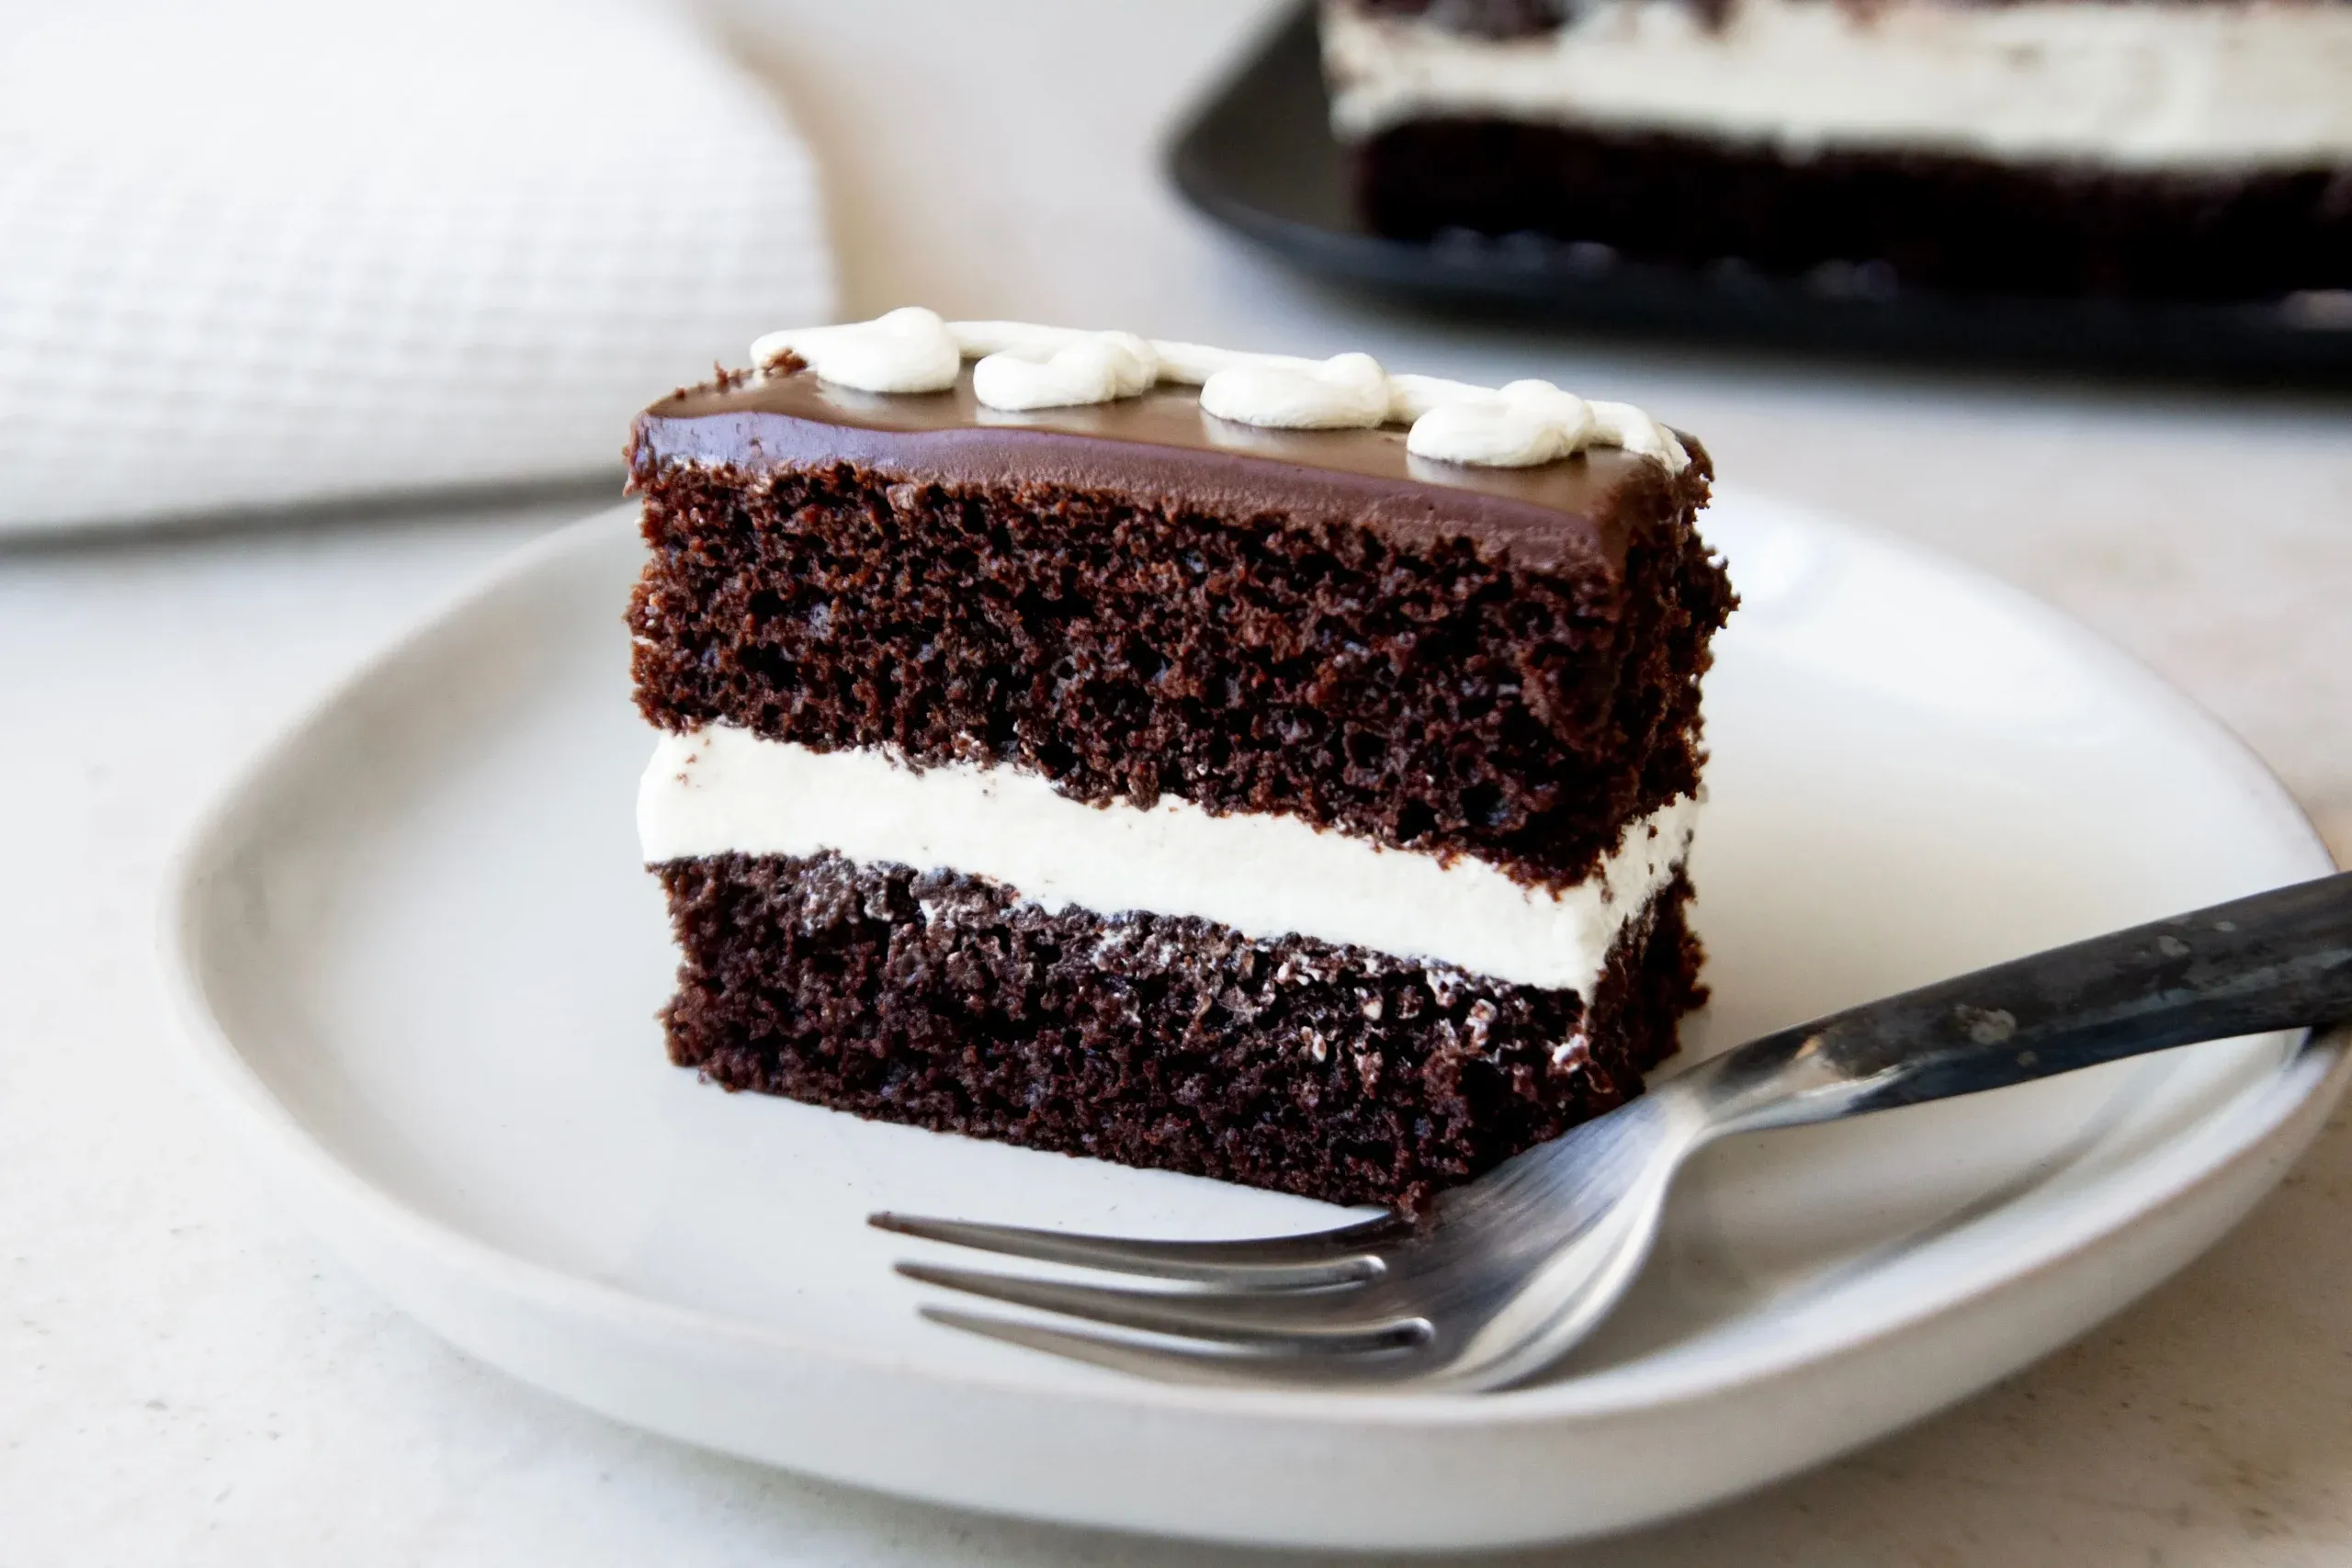
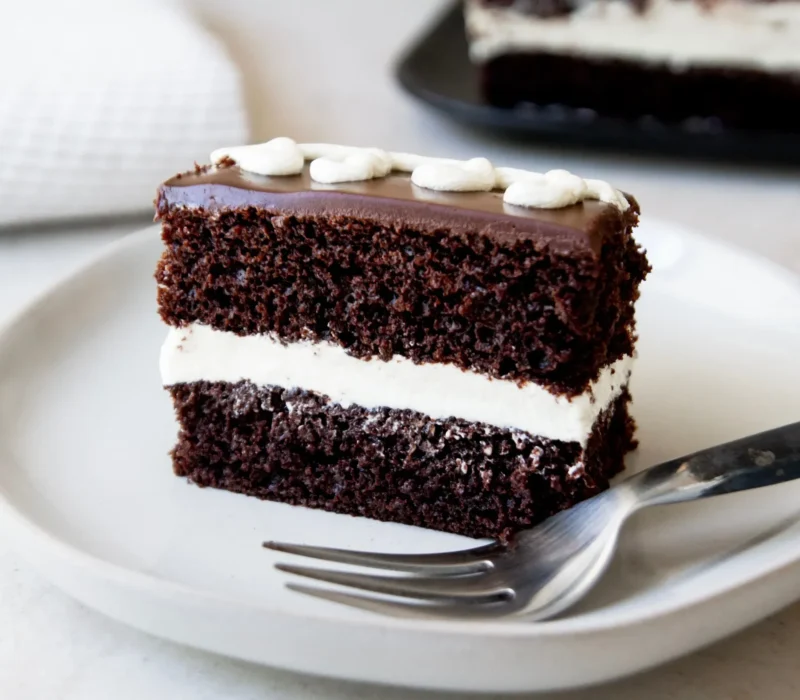
There are certain foods that stay with you long after childhood, and Hostess Cupcakes are one of them for me. The shiny chocolate coating, that iconic white icing squiggle, and especially the creamy filling tucked inside always made them feel like a special treat.
Going vegan sometimes means leaving some favorites behind, but after more than 30 years of plant-based eating, I’ve learned that most cravings can be recreated (and often improved) with the right method. That’s exactly what inspired my Vegan Hostess Cupcake Copycat Cake.
This nostalgic sheet cake combines two of my most popular recipes. The chocolate layers are made with my easy Better Boxed Vegan Cake method, one of my most popular recipes on the site, then sandwiched between the layers is a thick, silky vegan ermine frosting filling, giving this cake that signature cream-filled Hostess flavor everyone remembers.
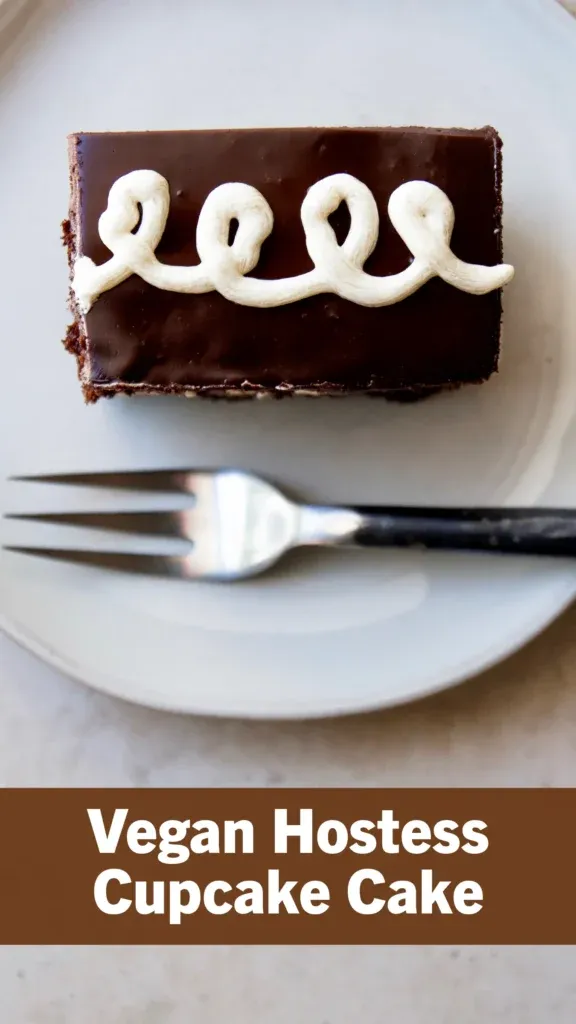
The finishing touch is an easy two-ingredient chocolate ganache poured over the top for that glossy chocolate coating, followed by the unmistakable white squiggle piped across the surface. Every bite delivers the flavors of those beloved snack cakes, only completely plant-based.
Despite its impressive appearance, this cake is pretty easy to make. Using a boxed cake mix keeps things simple, the ermine frosting comes together with basic pantry staples (although you do have to chill the base), and the two-ingredient ganache creates a beautiful finish with almost no effort. It’s the perfect dessert for anyone craving a little nostalgia but with a homemade upgrade.
How I Made It
After researching a lot of these cake interpretations online, I saw most of them used a standard rectangular baking pan but I knew one box of cake mix would most likely not stretch that far for two layers and my instincts were right. Using a 9-inch square pan was exactly the right size to produce two thicker even layers. I also found baking each layer separately was the better move. Trying to slice one larger cake in half then piecing it back together would most likely end in tears as the cake is more fragile in this state. I know most don’t have two pans of this size (I do not) so I baked them separately and they only took about 16 minutes in my convection oven so it was easy work.
To prepare the pans, I used nonstick aluminum foil as it’s more malleable to work with but parchment will do or just buttering or flouring a pan will work as well but you’ll have to invert your cake to remove it. I prefer the “sling” method where the foil or paper hangs over the sides and makes lifting the cake out much easier.

To assemble, I let the last baked layer in the pan and once completely cooled, added the filling then the last layer on top, wrapped it well then refrigerated overnight. That’s not necessary but a few hours in the fridge firms things up nicely before adding the ganache which I added also while the cake was still in the baking pan. Once set, I lifted the cake out and trimmed each edge with a long serrated bread knife then I piped the signature squiggles on top.
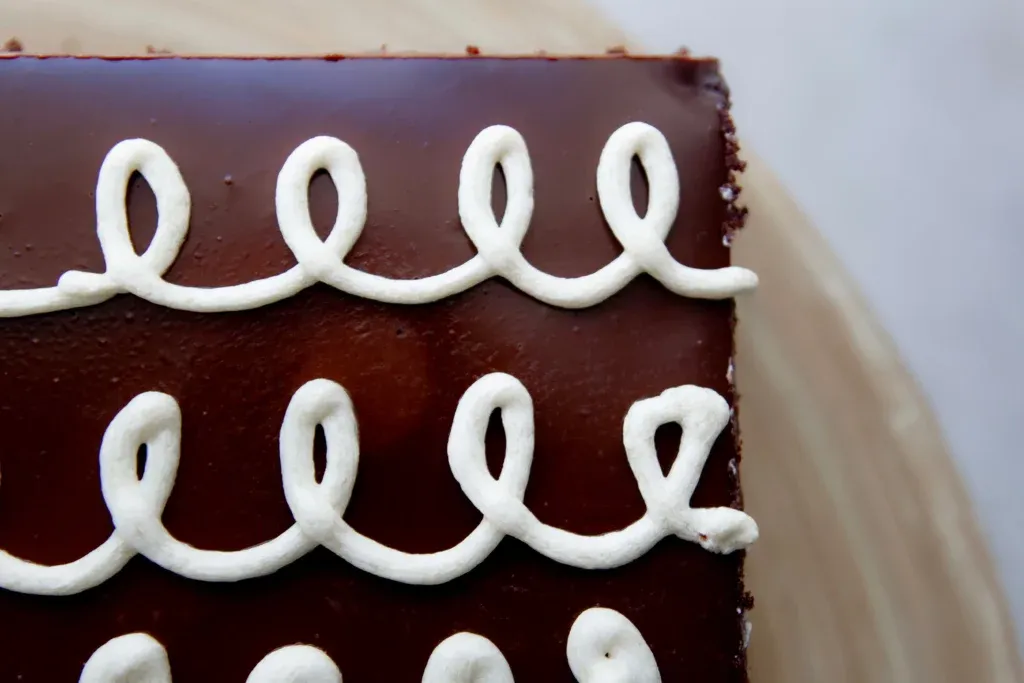
About Those Squiggles
You’ll save about 1/2 cup of the filling to pipe the squiggles and those were honestly challenging. I’m a decent at piping and even I found these to be harder than I thought to get perfect swirls. I suggest practicing on some wax paper first to get the feel of it. You can also either space the lines of squiggles out so each slice has one perfect centered line like the original cupcakes or closer together if you’re going to plan on serving thinner slices like I did. Doesn’t really matter either way but most examples I found online spaced the lines out more than you would think.
Whether you grew up sneaking Hostess Cupcakes out of the pantry or just love a good chocolate cake moment, my vegan copycat version delivers everything you want from the original and then some. The combination of the tender chocolate layers, silky ermine filling, and glossy ganache top makes this one of those cakes that disappears fast at any gathering. Make it the day before, pipe that squiggle but don’t stress over it, and watch people lose their minds over the show stopping cross section when you cut into it!
More Copycat Recipes!
Check out more of my copycat recipes below.
- My vegan Pepperidge Farm coconut cake recipe has more information on the ermine frosting filling and some FAQs.
- My better boxed vegan cake recipe has lots of information about my method in developing it.
- My Vegan Copycat Costco Brownie Walnut Pie recipe has more information about the easy ganache topping.
- Vegan Copycat Tollhouse Chocolate Chip Cookies
- Vegan Copycat Costco Chocolate Peanut Butter Pie
- Vegan Copycat Peanut Butter Tandy (Kandy) Cakes
Vegan Hostess Cupcake Cake
16
servings30
minutes16
minutes1
hour10
minutesEverything you loved about Hostess Cupcakes made into an easy vegan cake with a silky cream filling and glossy chocolate ganache top.
Keep the screen of your device on
Ingredients
- Better Boxed Cake
1 boxed chocolate cake mix (see notes)
2⁄3 cup vegan yogurt (5 oz) or vegan sour cream
2⁄3 cup vegetable oil
3⁄4 cup vegan milk
1 teaspoon lemon juice, apple cider or white vinegar
1 tablespoon cornstarch (see notes)
- Ermine frosting filling
1 cup (8 oz) full-fat oat or soy milk
3/4 cup granulated sugar
1/4 cup all-purpose flour (see notes)
3/4 cup vegan butter sticks, softened (see notes)
1 tsp vanilla extract
- Ganache Topping
4.5 oz chocolate (chips, chunks or bar)
1/2 cup vegan heavy whipping cream (see notes)
Directions
- Cake
- Preheat oven to 350°. Line a 9-inch square baking pan with either a nonstick foil “sling” or use parchment paper. You’ll be baking two separate layers so either use two pans of this size or bake them each separately. Whisk the lemon juice or vinegar into the vegan milk and set aside to curdle and thicken slightly for a few minutes.
- Place the boxed mix in a large mixing bowl and add the rest of the ingredients and mix with a hand mixer for 1-2 minutes until completely combined scraping down the sides of the bowl once or twice.
- Pour half of the batter into the prepared pan and level out evenly with a spoon or knife (this will make it look nicer when baked). You can either eyeball this or use a kitchen scale if you want to be extremely accurate. Tap the pan on the counter a few times to remove any large air bubbles and bake for 15-8 minutes or until a cake tester comes out clean. Watch carefully as all ovens differ and start testing easier than later. Let the first layer cool for 15 minutes then remove from the pan, prepare the pan the same way for the second layer and bake. Keep the last layer in the pan to cool completely before adding the filling.
- Ermine frosting filling
- Make the flour paste. In a small saucepan, whisk the flour and sugar together dry first. Add just a splash of the plant milk and whisk into a smooth paste with no dry clumps. Then slowly pour in the rest of the milk, whisking constantly. Put the pan on medium heat and cook, whisking the whole time, until the mixture thickens to a pudding-like consistency, about 5 to 7 minutes. Don’t rush it. Remove from heat, transfer to a heat safe bowl, and press plastic wrap directly onto the surface. Refrigerate until completely cool, at least 1 hour. Do not skip this step as using a warm paste in the next step will break your frosting. See the notes for guidance on avoiding getting lumps in the paste.
- In a stand mixer or with a hand mixer, beat the softened vegan butter on medium-high speed for 3 to 4 minutes until light and fluffy. Make sure to scrape down the sides of the bowl once or twice. With the mixer on medium, add the cooled flour paste one spoonful at a time. Once all the paste is incorporated, increase speed to high and beat for 2 to 3 more minutes until the frosting is silky, light, and holds soft peaks. Finally, add the vanilla extract and beat for another 30 seconds. Reserve 1/2 cup for the piped swiggles.
- Ganache Topping
- To make the ganache, combine the vegan cream and chocolate in a heat safe bowl and either over a smaller pan of simmering water or using the microwave, melt the chocolate. If using simmering water like a double boiler, whisk just until the chips are just melted and remove from the heat. If using the microwave, heat in 30 second intervals just until the chips start to melt. Don’t over cook as every microwave has a different power level and if you overcook the mixture will seize and there’s no coming back from that. Don’t let it boil. All the chocolate doesn’t need to be melted as the residual heat will continue to melt the chocolate.
- Assembling the Cake
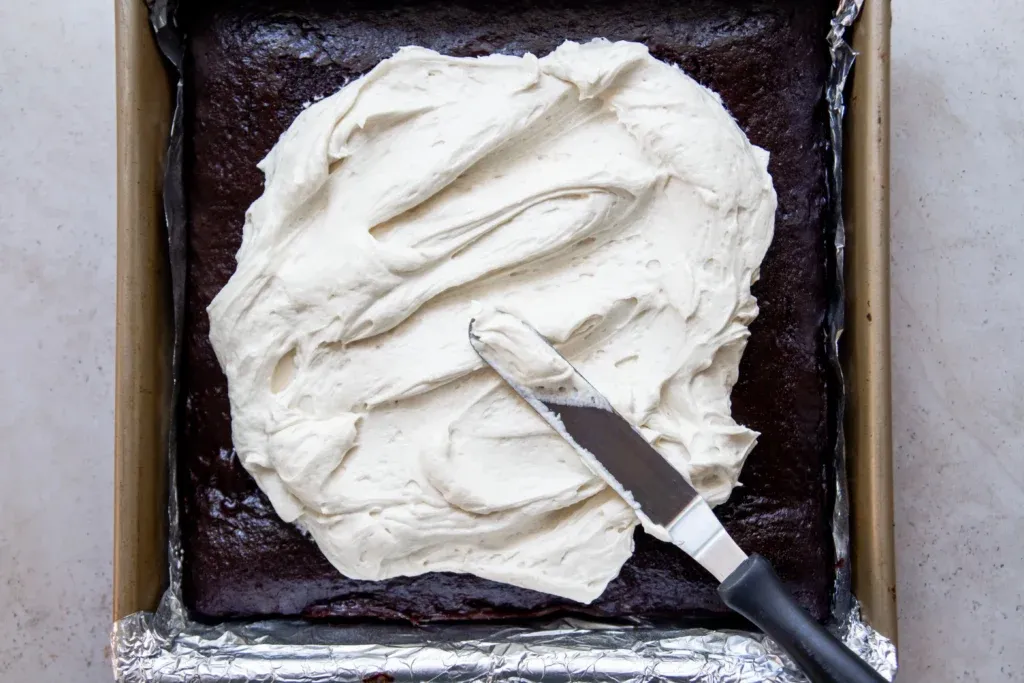
- With the bottom layer in the pan, spoon the frosting filling over the cake (making sure to reserve that 1/2 cup for the squiggles) and even out with an offset spatula or knife. Add the second layer (I usually flip the cake layer over with the bottom up on top as if often is more even then the top do the cake). Wrap and refrigerate for at least two hours or preferably overnight.
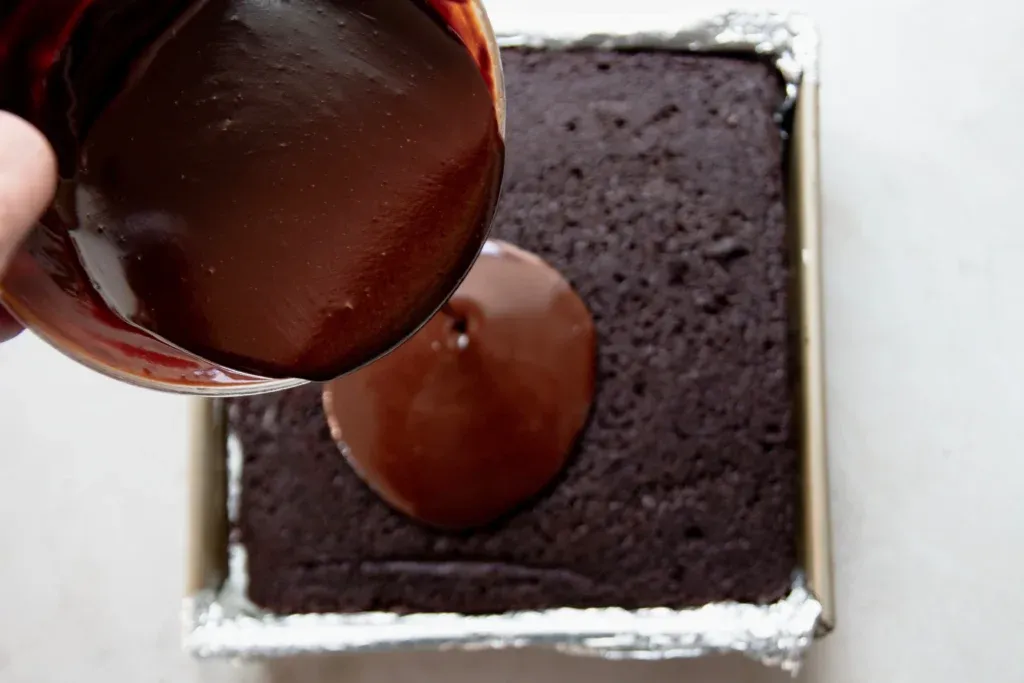
- Add the warm ganache over the top of the cake leveling it out evenly with an offset spatula or knife then refrigerate to set completely. Do not cover the cake while refrigerating as it will stick to the topping.
- Remove the cake completely from the pan using your “sling” you created for the bottom layer then trim the sides if desired using a larger serrated bread knife or sharp knife then pipe rows of squiggles over the top of the cake. See the main blog post about piping those. You could also pipe them diagonally if preferred. Cut into slices and serve. Refrigerate any leftovers.
Notes
- Use a standard boxed cake mix that typically calls for 3 eggs, 1/2 cup oil and 1 cup water. I prefer Duncan Hines brand and their Dolly Parton chocolate cake mix in particular and find those to work the best in my testing, but other brands will work as well.
- Cornstarch was best in my opinion for the cake, but can be substituted with arrowroot powder or potato starch. You could use finely ground flax meal or a powdered egg replacer as well.
- To avoid lumps in the flour paste, the flour should be fully dispersed before any heat touches it to keep the paste smooth. For a truly foolproof version, start with cold milk, add the flour and sugar, and hit it with a hand mixer or immersion blender for 10 to 15 seconds before the pan ever gets near the stove. Then cook as usual, whisking constantly, until thickened. If lumps do happen, you can strain it through a fine mesh strainer, or hit it with an immersion blender, which is what most bakeries would do. Just try to make sure the paste is fully smooth and completely cool before it goes near the butter. If it’s not, the coconut will hide any small lumps and it will still taste the same.
- Use plant butter sticks like Country Crock or Earth Balance versus vegan butter in a tub for better results.
Did you make this?
Tag @bigboxveganeats on Instagram and hashtag it #bigboxvegan
Pin this recipe!
Follow @bigboxvegan on Pinterest
Like Big Box Vegan on Facebook!
Follow us on Facebook


![[AD] @gomacro just launched something NEW and it is only at Whole Foods Market stores right now! 🆕🛒
Their GoMacro MacroSquares are a whole new bar format for them with layered textures, visible nuts and seeds, a signature diagonal dark, white chocolate or caramel dip, and a flaky sea salt finish which is chef’s kiss good. 😚
They’re all Organic, Vegan, Gluten-Free, Non-GMO, and C.L.E.A.N. Certified with 7 to 8g of protein per bar in four flavors: Peanut Butter Chocolate + Sea Salt, Caramel Almond + Sea Salt, Dark Chocolate Nuts + Sea Salt, and Berry White Chocolate + Sea Salt for $2.49 each so head on over to Whole Foods now!](https://scontent-dfw5-1.cdninstagram.com/v/t51.82787-15/726839669_18323335108279935_5110259994583560298_n.jpg?stp=dst-jpg_e35_tt6&_nc_cat=106&ccb=7-5&_nc_sid=18de74&efg=eyJlZmdfdGFnIjoiQ0FST1VTRUxfSVRFTS5iZXN0X2ltYWdlX3VybGdlbi5DMyJ9&_nc_ohc=e2GsGLsQ8okQ7kNvwG9zZHp&_nc_oc=AdqCQr-sYz7c5mIaiPwOv4M7Ww019j2ElpkJrQ95z-tnro93w5v9bj6F150k8i1F7QA&_nc_zt=23&_nc_ht=scontent-dfw5-1.cdninstagram.com&edm=ANo9K5cEAAAA&_nc_gid=0yPbx05w-zJLDTp8ek1peg&_nc_tpa=Q5bMBQEbWlGEf6WjxBj7e8aET5Kp8kFBRKONgLa2HTtvKQ47d76Ev9ofSn0VXIy2dfaN8SYnIXjMOg1P&oh=00_Af-aCg7USNeCmeb4zvRRVs_KYQF8EGHKuiNEHPl23L1evQ&oe=6A3B7B0B)
![[AD] @gomacro just launched something NEW and it is only at Whole Foods Market stores right now! 🆕🛒
Their GoMacro MacroSquares are a whole new bar format for them with layered textures, visible nuts and seeds, a signature diagonal dark, white chocolate or caramel dip, and a flaky sea salt finish which is chef’s kiss good. 😚
They’re all Organic, Vegan, Gluten-Free, Non-GMO, and C.L.E.A.N. Certified with 7 to 8g of protein per bar in four flavors: Peanut Butter Chocolate + Sea Salt, Caramel Almond + Sea Salt, Dark Chocolate Nuts + Sea Salt, and Berry White Chocolate + Sea Salt for $2.49 each so head on over to Whole Foods now!](https://scontent-dfw5-2.cdninstagram.com/v/t51.82787-15/726621222_18323335117279935_5097533975116879447_n.jpg?stp=dst-jpg_e35_tt6&_nc_cat=100&ccb=7-5&_nc_sid=18de74&efg=eyJlZmdfdGFnIjoiQ0FST1VTRUxfSVRFTS5iZXN0X2ltYWdlX3VybGdlbi5DMyJ9&_nc_ohc=XyqYgWImz90Q7kNvwHnXqml&_nc_oc=AdoUUqYf8DFx0Z9vuYFLuj6NRRFQpFq71fVLz7RcD0IE3rhPr7aZVsd2rM7l1FVG5i0&_nc_zt=23&_nc_ht=scontent-dfw5-2.cdninstagram.com&edm=ANo9K5cEAAAA&_nc_gid=0yPbx05w-zJLDTp8ek1peg&_nc_tpa=Q5bMBQEXM-eX8-jHRIzPLWNyMlUfyLQ5pZYWQ5kaFS4gDECh7eajDPduPSgRsR31rN0n6FFhbXksKEx6&oh=00_Af_yOOW6K_lk4siJe6nC7cCGHRgceBVJx-s-_056B5aTwQ&oe=6A3B6058)
![[AD] @gomacro just launched something NEW and it is only at Whole Foods Market stores right now! 🆕🛒
Their GoMacro MacroSquares are a whole new bar format for them with layered textures, visible nuts and seeds, a signature diagonal dark, white chocolate or caramel dip, and a flaky sea salt finish which is chef’s kiss good. 😚
They’re all Organic, Vegan, Gluten-Free, Non-GMO, and C.L.E.A.N. Certified with 7 to 8g of protein per bar in four flavors: Peanut Butter Chocolate + Sea Salt, Caramel Almond + Sea Salt, Dark Chocolate Nuts + Sea Salt, and Berry White Chocolate + Sea Salt for $2.49 each so head on over to Whole Foods now!](https://scontent-dfw5-1.cdninstagram.com/v/t51.82787-15/726440210_18323335126279935_6307007590750227468_n.jpg?stp=dst-jpg_e35_tt6&_nc_cat=105&ccb=7-5&_nc_sid=18de74&efg=eyJlZmdfdGFnIjoiQ0FST1VTRUxfSVRFTS5iZXN0X2ltYWdlX3VybGdlbi5DMyJ9&_nc_ohc=8JuwB6SmBCkQ7kNvwHZ-KtI&_nc_oc=AdqMfH9jvvhbkaETkPKoyKUrk-UhCDZa98Y0LBBYOaww6TSWmAK_TmQQG3eJ_3wDWSo&_nc_zt=23&_nc_ht=scontent-dfw5-1.cdninstagram.com&edm=ANo9K5cEAAAA&_nc_gid=0yPbx05w-zJLDTp8ek1peg&_nc_tpa=Q5bMBQFQFjjldfFkgmbFW-iZtIJeNsQ0xnYp9bYN20OelySUeDYnTAAB68VssLcNoiP1PvHMI5wSlxSn&oh=00_Af-Vg_HHgypFV-p7x365cVJzqHsR5FcNqX9BLCViJZVIhg&oe=6A3B47FC)
![[AD] @gomacro just launched something NEW and it is only at Whole Foods Market stores right now! 🆕🛒
Their GoMacro MacroSquares are a whole new bar format for them with layered textures, visible nuts and seeds, a signature diagonal dark, white chocolate or caramel dip, and a flaky sea salt finish which is chef’s kiss good. 😚
They’re all Organic, Vegan, Gluten-Free, Non-GMO, and C.L.E.A.N. Certified with 7 to 8g of protein per bar in four flavors: Peanut Butter Chocolate + Sea Salt, Caramel Almond + Sea Salt, Dark Chocolate Nuts + Sea Salt, and Berry White Chocolate + Sea Salt for $2.49 each so head on over to Whole Foods now!](https://scontent-dfw6-2.cdninstagram.com/v/t51.82787-15/726838562_18323335135279935_880419606163154118_n.jpg?stp=dst-jpg_e35_tt6&_nc_cat=108&ccb=7-5&_nc_sid=18de74&efg=eyJlZmdfdGFnIjoiQ0FST1VTRUxfSVRFTS5iZXN0X2ltYWdlX3VybGdlbi5DMyJ9&_nc_ohc=mkn3rm19Qt0Q7kNvwEfNM77&_nc_oc=AdrpqzNsy_LTb1GrLI6DQiDIUgYzDLhDeO7CfrJzBkBNHJuxUhns7T-Yx0jsxGy-ZOE&_nc_zt=23&_nc_ht=scontent-dfw6-2.cdninstagram.com&edm=ANo9K5cEAAAA&_nc_gid=0yPbx05w-zJLDTp8ek1peg&_nc_tpa=Q5bMBQEA9--gHE58Mwym3W4iZ2H6M6GxO8r75CInSNYqElO27cmdF9HKV2lJAY9cnnISAt2VvigKGHHB&oh=00_Af87IJZbIf1mK8ynYyBxYE7WNmIHmnEImAhOkR8p0-sIsQ&oe=6A3B46F6)


